2nd page of the posts archive.

We all know how indexes work. The first item is 0, the second item is 1; CS49-topic;

So really, there's no doubt about what this code means:

$blocks[0]['name'] === 'acme/image';

Also, no doubt about what this one means:

$blocks[1]['name'] === 'acme/image';

Let's suppose that's really the gist of the "code": checking if the "name" of the first or second "block" matches "acme/image".

I think having a conditional like this is okay:

if ($blocks[0]['name'] === 'acme/image') {
return 'something';
}
 
if ($blocks[1]['name'] === 'acme/image') {
return 'something else';
}

It just gets the job done.

Extracting to a variable or constant the "block type" would be a slight improvement:

const IMAGE_BLOCK = 'acme/image';
 
if ($blocks[0]['name'] === IMAGE_BLOCK) {
return 'something';
}
 
if ($blocks[1]['name'] === IMAGE_BLOCK) {
return 'something else';
}

Capturing and hiding away the "block structure" is an idea to explore:

function blockNameMatches(array $block, string $name): bool
{
return $block['name'] === $name;
}
 
if (blockNameMatches($blocks[0], IMAGE_BLOCK)) {
return 'something';
}

Building on top of these low-level functions could bring some clarity and specificity:

function isBlockAnImageBlock(array $block): bool
{
return blockNameMatches($block, IMAGE_BLOCK);
}
 
if (isBlockAnImageBlock($blocks[0])) {
return 'something';
}

However weird it might seem at first sight, using constants in place of those indexes makes things more readable to me:

const FIRST = 0;
const SECOND = 1;
 
if (isBlockAnImageBlock($blocks[FIRST])) {
return 'something';
}
 
if (isBlockAnImageBlock($blocks[SECOND])) {
return 'something else';
}

But somehow, for big numbers, like FIVE_HUNDRED_AND_TWENTY_TWO, it no longer works.

And, of course, there's no limit; we can go even further:

function isFirstBlockAnImageBlock(array $blocks): bool
{
return isBlockAnImageBlock($blocks[FIRST]);
}
 
if (isFirstBlockAnImageBlock($blocks)) {
return 'something';
}
 
if (isSecondBlockAnImageBlock($blocks)) {
return 'something else';
}

Is it better now or worse? When was good enough?

I like that there are no straightforward answers to these questions.

WordPress.com and WordPress VIP hosting offers an image transformation API.

Although their exact implementation remains unknown to the public, they use a customized version of Photon, which is open-source.

If you favor a prescriptive syntax over a descriptive syntax for your responsive images, then Photon or a comparable solution is indispensable or, at the very least, extremely useful.

At present, the selected hosting for "my" client, WordPress VIP, does not provide a local development environment with the image transformation capabilities.

VIP File System, Cron control, and Page cache services are not built-in. When developing features for an application that relies on these services, it is strongly recommended to stage changes and perform tests on a non-production VIP Platform environment.

Not being able to test services locally but only on the hosting environment is not the most efficient approach for rapid delivery.

Consequently, I decided to try to set up Photon locally on my own.

Setting up Photon locally

While most code from WordPress.org is open-source, the infrastructure and configuration details aren't publicly available. We can only make educated guesses about the PHP extensions, libraries, and so on, installed on their server.

Dockerized Photon: the starting point

Chris Zarate shared a Dockerized Photon, which served as an excellent starting point.

Lacking any official documentation regarding Photon's requirements, this provided the technology stack needed to run it. At least, the stack required six years ago, which is the date of the last commit in the repository.

I didn't expect it to work out of the box, and indeed, it didn't. Some of the libraries were no longer accessible. However, since most of the requirements are similar to a more involved LAMP stack, it was easy to find newer versions or alternatives to the requirements.

Photon's configuration

Photon's main entry file expects a config.php file, which is not made available - for good reasons, presumably.

This forced me to scan the code and try to decipher some of the logic, as things weren't functioning even after setting up the infrastructure.

Ultimately, even though I'd rather not know anything about Photon's internals, this turned out to be advantageous. It led me to find the override_raw_data_fetch filter, which allowed me to control the image loading process.

Photon up and running

Check this video, where I get the Photon service up and running and where I explain some extra things.

There are things to improve, but after weighing the trade-offs between development time, complexity, and the specific needs of my project, I settled to stop at this point.

I might return to Photon and implement some image caching and other good things.

Serving the WordPress images: different approaches

Depending on yor WordPress installation, you might opt to modify the attachment URLs with a function like wp_get_attachment_image_src, use a rewrite rule to redirect all images to the container, or set up a proxy.

All are valid solutions in different circumstances.

Integrating Photon with DDEV

As the project I'm working on uses DDEV, it made sense to add it as an additional service rather than run it as a standalone Docker container outside DDEV.

Creating an Additional Docker Compose File

This can be achieved by creating an additional Docker Compose file.

While the documentation on setting up additional services is brief, they do have a contribution repository with plenty of examples.

version: '3.6'
 
services:
photon:
container_name: ddev-${DDEV_SITENAME}-photon
hostname: ${DDEV_PROJECT}-photon
build: ./photon/
expose:
- '80'
labels:
com.ddev.site-name: ${DDEV_SITENAME}
com.ddev.approot: $DDEV_APPROOT
environment:
- VIRTUAL_HOST=$DDEV_HOSTNAME
- HTTP_EXPOSE=8078:80
- HTTPS_EXPOSE=8079:80
- SERVER_NAME=ddev-${DDEV_PROJECT}-photon
volumes:
- ../public/wp-content/uploads:/var/www/html/uploads

Nginx Configuration: Proxy or Redirect

It also required the modification of the Nginx config file. I opted to go with a proxy.

location ~ /wp-content/uploads/.*(jpe?g|png|webp|gif)$ {
rewrite /wp-content/uploads/(.*)$ /$1 break;
proxy_pass http://photon;
}

But I had it working as redirect before that:

location ~* (.*/wp-content/uploads/)(.*jpe?g|png|webp|gif)$ {
return 307 https://$host:8079/$2$is_args$args;
}

The 307 status is "Temporary Redirect"; not that it would matter locally.

If we exaggerate a little, there's always something new to learn when reading someone else's code, even for seasoned veterans like Freek Van der Herten.

In his article, Discovering PHP's first-class callable syntax, Freek shares how he came across a PHP feature while examining the Laravel codebase.

This is the first example I've come across where this particular feature is employed in such an appealing way.

I came across the Blazingly Fast Markdown Parsing in PHP using FFI and Rust by Ryan Chandler, which is a good read if you just heard about FFI. Available since PHP 7.4, by the way.

FFI stands for "Foreign Function Interface". [...] it allows you to interact with functions written in a totally different programming language.

The article is easy to follow and very pragmatic. No Rust experience is needed.

Unicode is a vast topic, and so is Regular Expression (regex).

You can know little about Unicode or even nothing when using regex. But if you are dealing with non-English (non-Latin) text, some knowledge is needed.

To understand why this regex \p{Arabic} is valid (in most implementations) and why it works, you must know the following fundamental things about Unicode.

The fundamentals of the Unicode fundamentals

On the one hand, Unicode maps characters to code points.

If we take the © character as an example, its code point is U+00A9. The 00A9 is in hexadecimal (base-16); if we converted that to decimal, we would get 169.

There are over 149000 characters that have a code point. A lot!

As mentioned, Unicode is a vast topic; there's no space here to explain why some characters can have multiple code points, why two code points represent accented characters, etc.

Qualities

On the other hand, Unicode, besides the mapping, defines some character qualities.

For example, Unicode "knows" about the character A (U+0041) that it's an uppercase letter, and it's written from left to right.

Many other characters have similar qualities. The character E is also uppercase and left to right written.

If you want to select all uppercase letters with regex, how would you do it? Would you use the [A-Z]? That doesn't select non-English (non-Latin) uppercase letters.

A regex that matches the uppercase quality is: \p{Lu}.

\p for quality (property), {Lu} for a letter that is uppercase. {L} would be any letter.

Scripts

But there are other ways, more obvious ways, to group characters than by their case.

The A, E are not letters of the Chinese writing system, nor letters of the Arabic writing system. It's definitely something latinesq?!, latinish?!

And not surprisingly, this quality, the quality of belonging to a writing system, is also stored in Unicode. This is referred to as script quality.

Of course, not all characters "belong to a script"; consider the mentioned ©.

Back to the beginning

Similarly to the possibility of matching the case (quality) with regex, there's a way to match the script. Conveniently, there's no abbreviation, simply the name of the writing system.

And we arrived at why the \p{Arabic} regex matches Arabic characters.

Another example: the \p{Cyrillic} regex matches Cyrillic characters.

And so on.

At news outlets tagging an article is not a trivial matter. Writers, editors don't come up with tags; they choose from highly standardized, predefined lists. One such list is maintained by International Press Telecommunications Council (IPTC).

Media Topics is a constantly updated taxonomy of over 1,200 terms with a focus on categorising text.

Using controlled vocabularies rather than simple keywords allows for a consistent coding of news metadata across news providers and over the course of time.

Imagine you have the Media Topics available as terms of the iptc_media_topic taxonomy in WordPress.

The question is: do you need a custom term selector for it?

The default term selectors

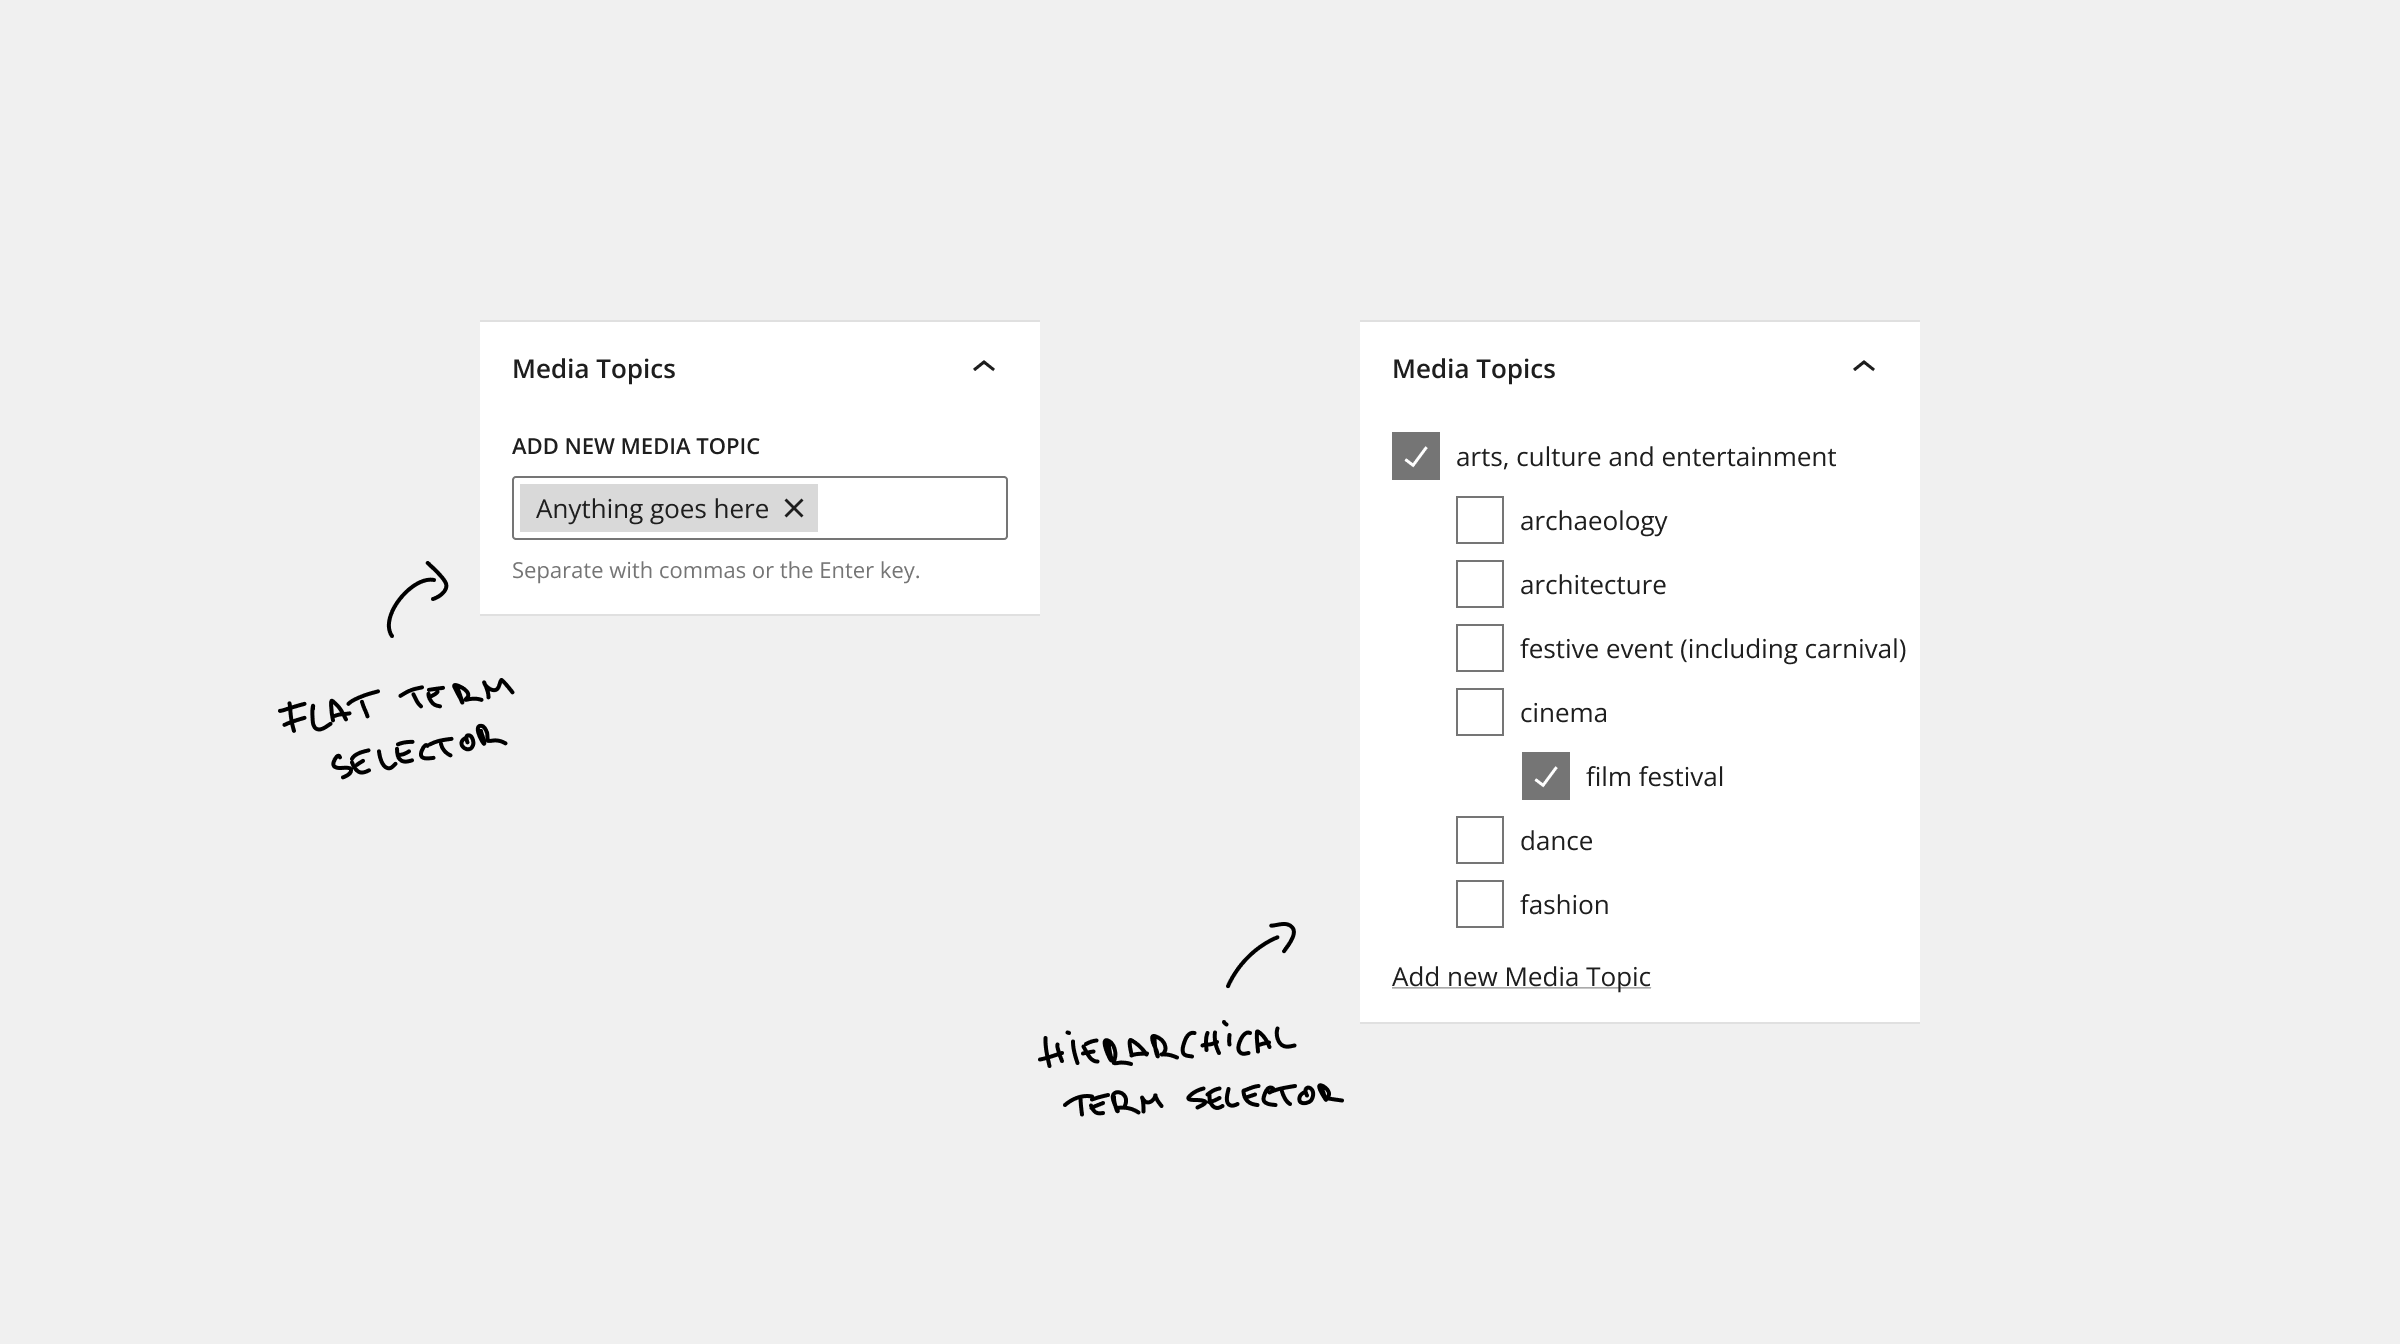
By default, in the Block Editor, there are two types of selectors for taxonomies: the HierarchicalTermSelector and the FlatTermSelector.

Here are a few reasons why these won't cut it for the IPTC Media Topics selector.

Conveniently the selectors offer the ability to create terms inline without needing to go to a different admin screen. In our case, we should prevent introducing custom Media Topics (terms) to protect the integrity of the "controlled vocabulary". Having the option to create new ones easily is asking for trouble.

From a technical perspective, there's a good chance that rendering over 1200 items with the Hierarchical Term Selector would start hampering the performance of the UI.

Non-optimized components for large datasets can quickly degrade the experience of the Block Editor. We should strongly consider list virtualization for a custom implementation that renders just items visible to the user rather than the entire list at once.

Design-wise, seeing hundreds and hundreds of nested checkboxes is overwhelming and noisy. It gets the job done, but there are better choices. One alternative that, in certain circumstances, comes up as superior is the chips.

The custom selector

Editors either know which Media Topics they want to use or they want to pick one that fits. This means there are two different modes of usage.

UI elements typically are optimized for one usage, so the solution to this puzzle is a combined, hybrid selector.

A few alternatives were considered, like the "multiple selection dropdown" or some kind of a "drill-down menu", but in the end, they were ruled out because they did not provide a good overview, were too cluttered, etc.

Search by typing

To keep the consistency of the UI, we can use the component called FormTokenField from WordPress. It's the same component used for the FlatTermSelector, but a more low-level component.

This will be the primary selector that is used for searching, removing the items, and presenting the choices.

Compared to FlatTermSelector this does not have the option to add new terms freely; only the possibility of selecting from the suggestion exists.

Discover

Having a tree-type selector is a good fit. It reflects the Media Topics' hierarchical nature, but it also allows a better browsing experience than the checkboxes list. It's a more compact and less busy option.

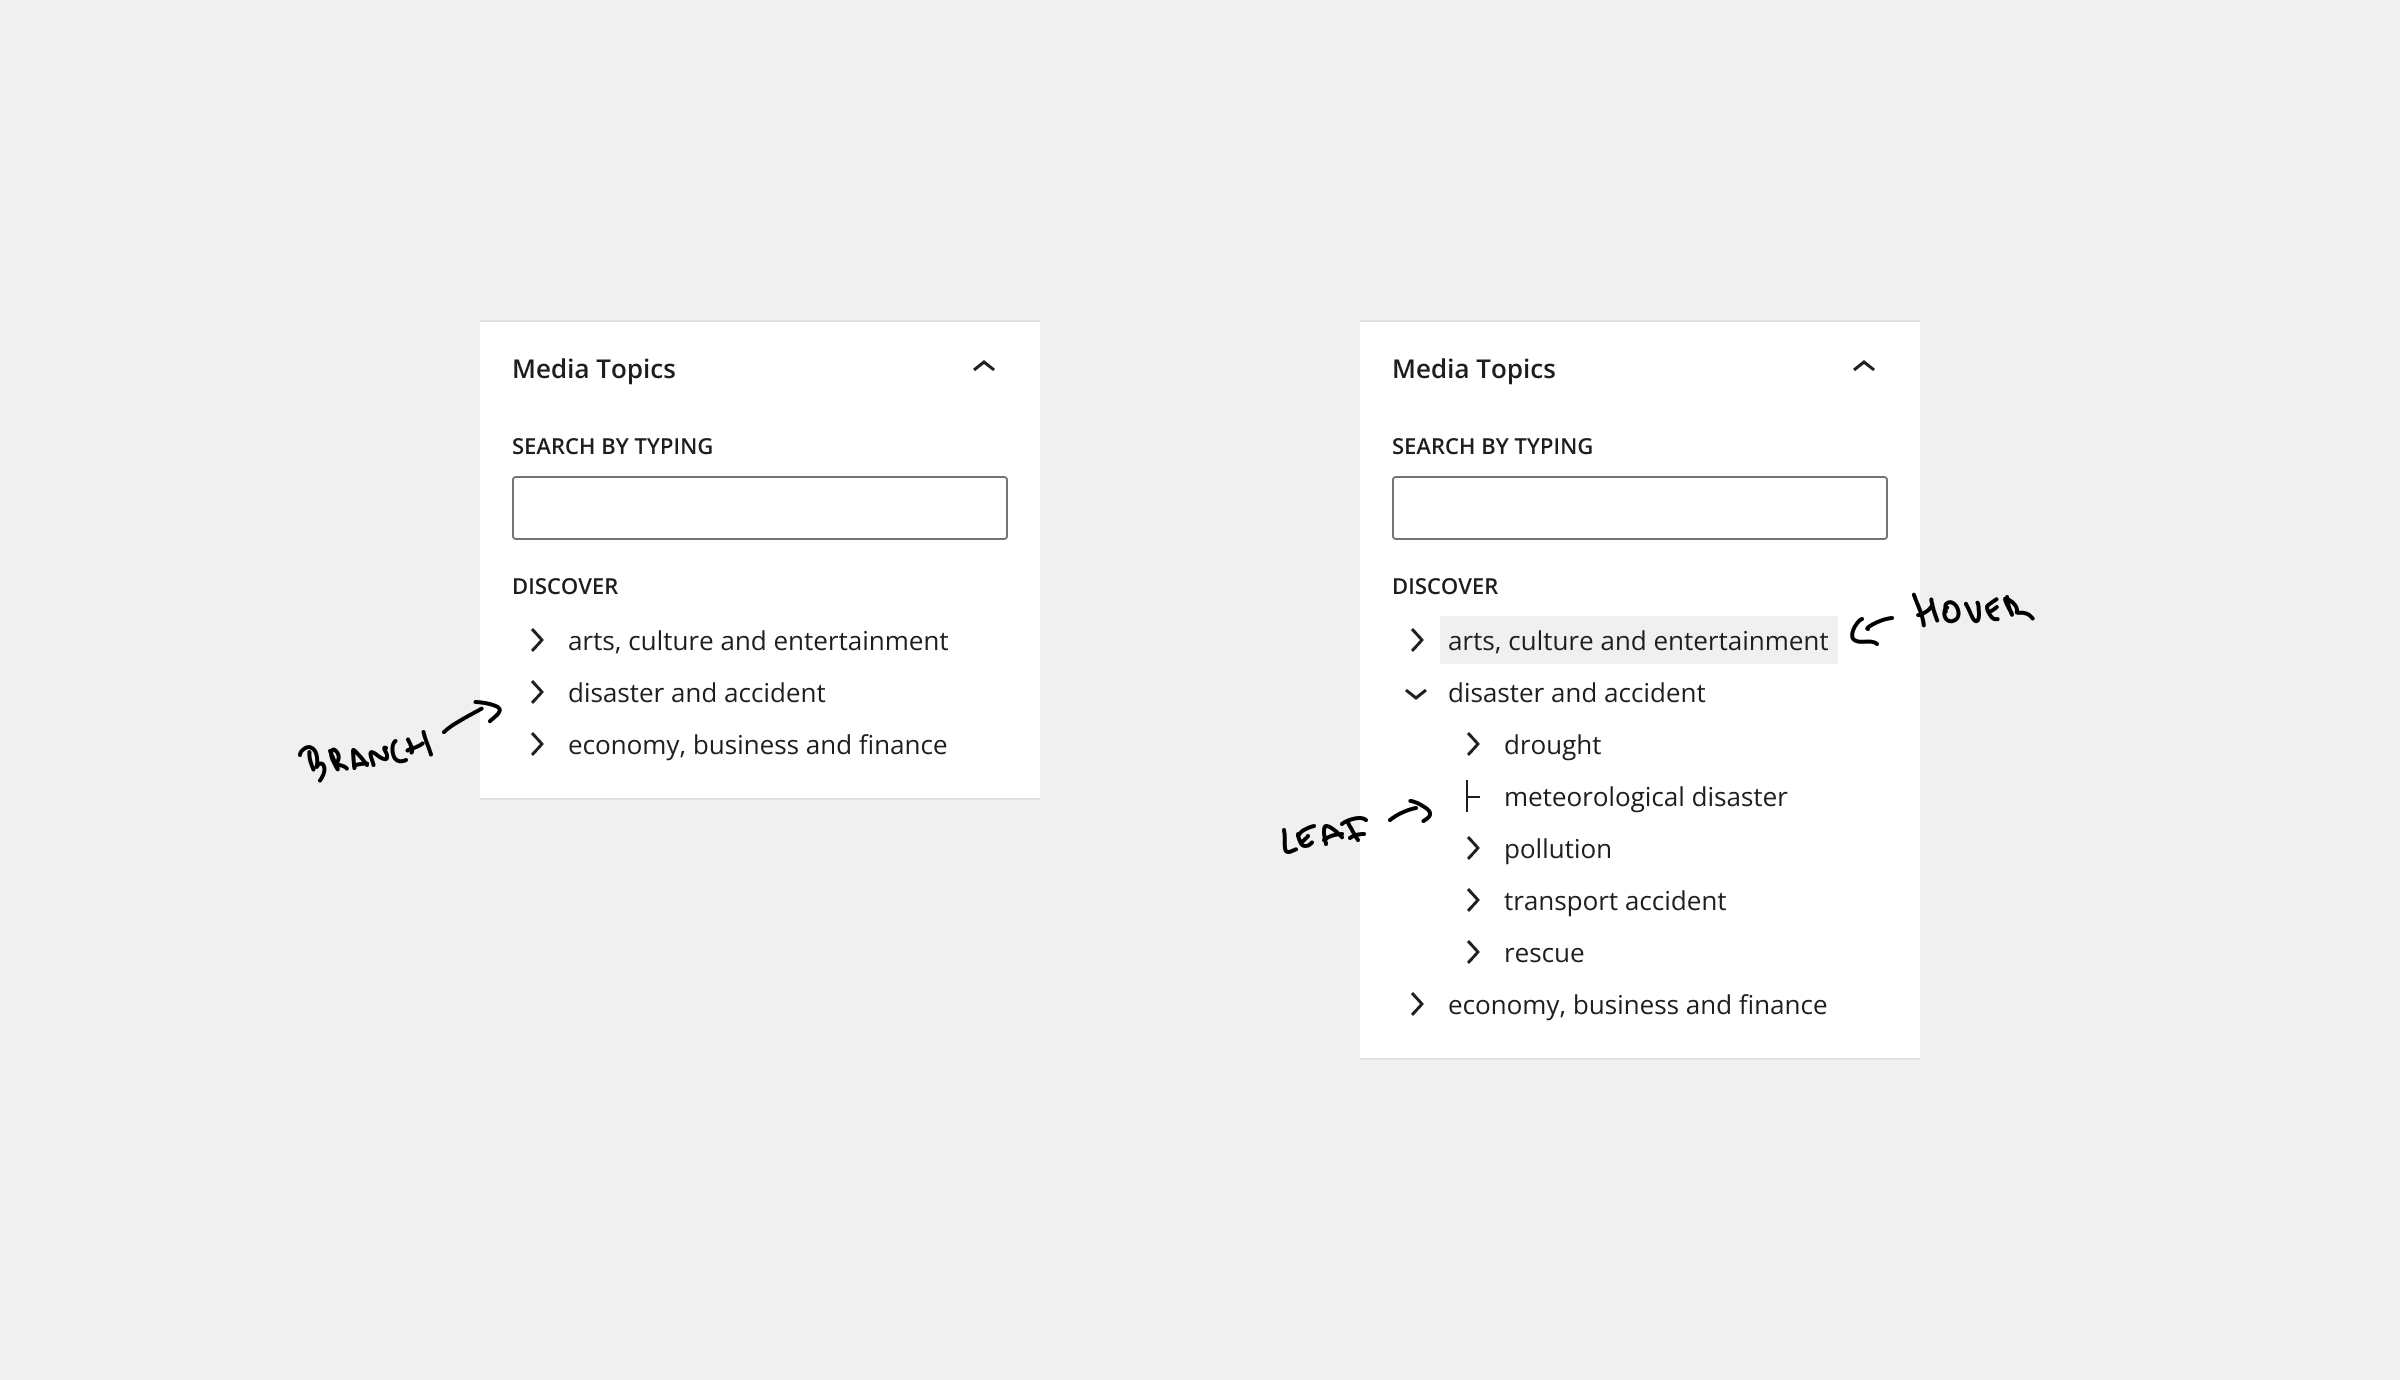
Not surprisingly, the IPTC Media Topic NewsCodes are also presented with a tree-type selector.

For this, there's no WordPress component we could use. The closest is the TreeGrid, but that is for tabular data and provides only little out-of-the-box functionality for our needs. Creating a tree component might seem deceivingly simple, but there are many gotchas. Using a 3rd-party tree component, like rc-tree, could save a lot of time.

We should integrate new components, custom or 3rd-party, as seamlessly as possible. Details such as using WordPress library icons and consistent font sizes and colors make a big difference.

State synchronisation

Even though there will technically be two separate React components, sharing a common state is possible and a common pattern.

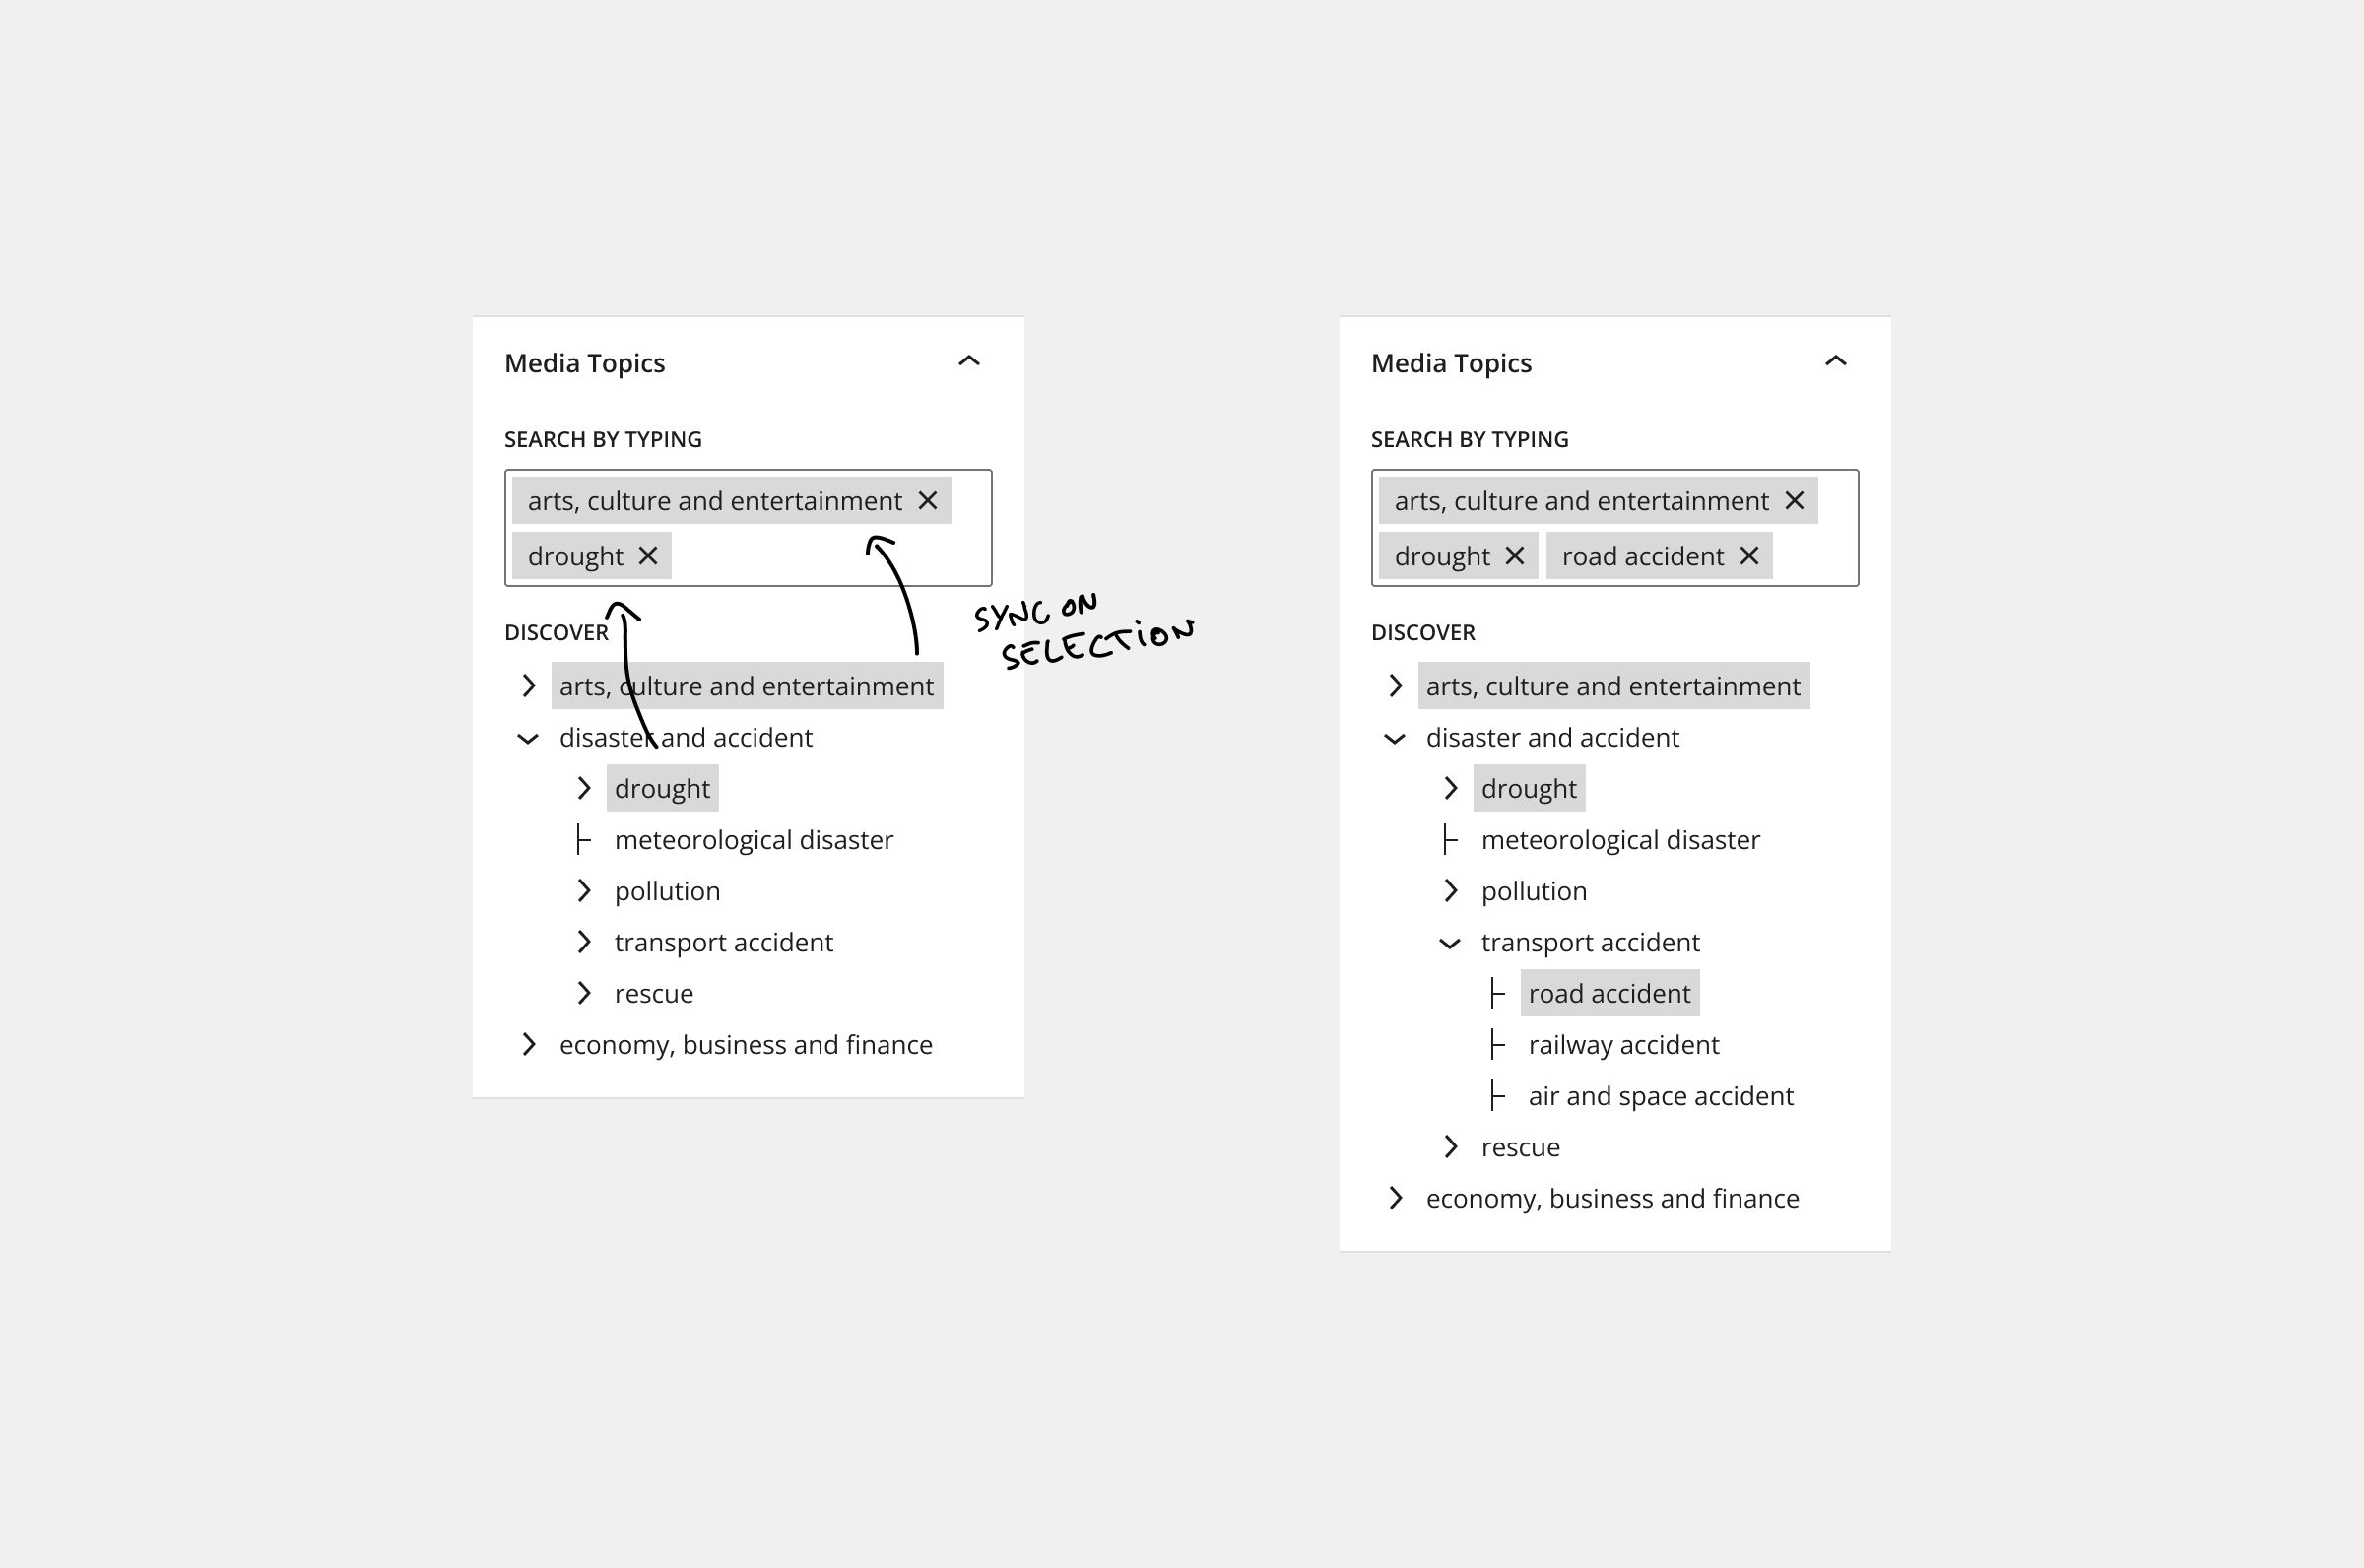
By making sure that selections are reflected in both selectors, they will look seamless and a cohesive unit.


Working on UI elements for the Block Editor is an interesting cross-section between development and hobby-UX/UI design. Some prefer to work only on the implementation, but I also like to get hands-on with this part.

Thinking through, creating the mockup, and pitching the solution for a client project was rewarding, not just because it was accepted.

This is, of course, a summary of the more crucial angles presented logically. The entire process was more hectic, sometimes even intuitional, building on prior knowledge. These highly polished mockups were created for this article; something low-fidelity was perfect enough to get the ideas across.

Special thanks to G.V., a proper designer, for suggesting adding the "Discover" title before the tree selector. A minor detail with an overall impact; clarifies both the intention of the element and creates better visual separation.

When I was considering using Jigsaw, a PHP static site generator, quite early, I ran into a detail I didn't like. It's the default Markdown parser that it uses.

There's nothing wrong with the PHP Markdown library from Michel Fortin per se. It just does not support the GitHub-Flavored Markdown (GFM). One extension that GFM has, and I use, is the Task list items:

- [ ] foo
- [x] bar

I'm not the only one who would prefer a parser that supports GFM. Somebody already brought this topic up, and supposedly it will come in version 2 of Jigsaw.

Since there's no timeline for version 2, that can mean anything.

But if you want it today and not tomorrow, what can you do? Swap the parser yourself.

Jigsaw uses Laravel's service container, and it exposes it during the bootstrapping process.

Here's the provider where the Markdown service is registered:

<?php
 
namespace TightenCo\Jigsaw\Providers;
 
use TightenCo\Jigsaw\Support\ServiceProvider;
use Mni\FrontYAML\Markdown\MarkdownParser as FrontYAMLMarkdownParser;
 
class MarkdownServiceProvider extends ServiceProvider
{
public function register(): void
{
$this->app->singleton('markdownParser', fn (Container $app) => new MarkdownParser);
$this->app->bind(FrontYAMLMarkdownParser::class, fn (Container $app) => $app['markdownParser']);
}
}

And here is where the container is made available for us:

<?php
 
namespace TightenCo\Jigsaw\Providers;
 
use TightenCo\Jigsaw\Support\ServiceProvider;
 
class BootstrapFileServiceProvider extends ServiceProvider
{
public function register(): void
{
if (file_exists($bootstrapFile = $this->app->path('bootstrap.php'))) {
$container = $this->app;
 
include $bootstrapFile;
}
}
}

All these results in us being able to do, for example, this in the bootstrap.php

<?php
 
/** @var \Illuminate\Container\Container $container */
$container->has('markdownParser'); // -> true

Using the CommonMark package

Laravel's service container implements PSR-11 (Container Interface). But the PSR does not dictate how something is added or bound to the container. Also, it does not specify if there should be a way to overwrite something. These details are always specific to the implementation.

From our service container implementation perspective, overwriting something is the same as adding it, and we already saw how the default parser is bound.

CommonMark does not support the tasks list extension by default, but the configuration is well documented.

Besides this, the only thing that is left, is satisfying the interfaces we are working with, similary to the default:

use Mni\FrontYAML\Markdown\MarkdownParser as FrontYAMLMarkdownParser;
use League\CommonMark\Environment\Environment;
use League\CommonMark\Extension\CommonMark\CommonMarkCoreExtension;
use League\CommonMark\Extension\Attributes\AttributesExtension;
use League\CommonMark\Extension\TaskList\TaskListExtension;
use League\CommonMark\MarkdownConverter;
 
$container->singleton(
'markdownParser',
fn() => new class implements FrontYAMLMarkdownParser {
readonly private MarkdownConverter $parser;
 
public function __construct()
{
$environment = new Environment([]);
$environment->addExtension(new CommonMarkCoreExtension());
$environment->addExtension(new AttributesExtension());
$environment->addExtension(new TaskListExtension());
 
$this->parser = new MarkdownConverter($environment);
}
 
public function parse($markdown)
{
return $this->parser->convert($markdown);
}
}
);

Because I did not work extensively, I'm unsure if it's an absolute requirement to implement the magic __get and __set methods. With a simple blog, it worked without those.

Pushing your code might indicate that you are ready or close to ready, working towards a solution. And some argue it's unacceptable to push code to a branch that might throw an error, leave the application in an unusable state, etc.

On the other hand, accidentally deleting your local, unpushed branch after days of work is a major ... pain.

If the feature is large enough, it takes days, weeks to complete it. Inevitably, one day, you'll leave the code in an undesirable state, close the computer, and leave the house. What do you do? Do you push your code to the feature/xyz branch even if it's not working at that point?

How can the tension between "always push your code" and "don't leave your code in unfit shape" be resolved?

If you have not opened a PR yet, one solution is to rename your branch from feature/ to wip/, prototype/, or anything that sets the right expectation for others.

Or always start with the wip/ and keep it until you are confident enough, then rename it to the feature/ prefix.

The wip/ is a good middle way between pushing and not pushing.

Some niceties pop up in WordPress versions that are easy to miss.

Here's one that I almost did: "a CSS custom property to offset the admin toolbar height" introduced in version 5.9.

Let's take this CSS code from a default theme:

.screen-height {
min-height: 100vh;
}
 
.admin-bar .screen-height {
min-height: calc(100vh - 32px);
}
 
@media (max-width: 782px) {
.admin-bar .screen-height {
min-height: calc(100vh - 46px);
}
}

All this work is required because we might or might not have the admin bar. And if we do, the height of the admin bar changes based on the screen size.

Something similar is found in many themes; it's almost boilerplate code.

With the introduction of --wp-admin--admin-bar--height, if we would refactor this piece of code, we could do the following:

.screen-height {
min-height: calc(100vh - var(--wp-admin--admin-bar--height, 0px));
}

It's much more convenient because we no longer have to care about the logic behind all the cases; we only have to retrieve the exposed calculated height.

See more on the 3rd page